#how to clear disk space on windows 10
Explore tagged Tumblr posts
Visit Tumblr Blog
Explore Tumblr blogs with no restrictions, modern design and the best experience.
Last Seen Tumblr Blogs


Fun Fact
Tumblr was created by web developers David Karp and Marco Arment.
Text
Learn effective techniques on how to clear space on Windows 10 with our comprehensive guide. Discover step-by-step instructions to free up valuable disk space, manage files, and optimize storage. Reclaim room for important files and boost your system's performance with these space-saving strategies.
#How to Clear Space on Windows 10#how to free up space on windows 10#how to clear disk space on windows 10#how to free up disk space on windows 10#how to free up memory on windows 10
1 note
·
View note
Text
How to Free Up Space on Windows 10: A Comprehensive Guide
As your Windows 10 system accumulates more files and applications, it can start to slow down and become less efficient. Freeing up space not only improves your system’s performance but also extends its lifespan. In this guide, we’ll explore various methods to free up space on Windows 10, going beyond the basics to ensure you have a well-optimized system.

Table of Contents
Introduction
Understanding Disk Space Usage
Utilizing Built-in Windows Tools
Disk Cleanup
Storage Sense
Uninstalling Unnecessary Applications
Managing Temporary and Cached Files
Cleaning Up System Files
Windows Update Cleanup
System Restore and Shadow Copies
Using Third-Party Disk Cleaners
Handling Large Files and Folders
Moving Data to External Storage
Using Cloud Storage Solutions
Conclusion
1. Introduction
As modern software and files grow larger, managing disk space effectively becomes crucial. This guide offers practical steps and tips to reclaim disk space on your Windows 10 computer, ensuring it runs smoothly and efficiently.
2. Understanding Disk Space Usage
Before freeing up space, it’s essential to understand how your disk space is being used. Navigate to Settings > System > Storage to view a detailed breakdown. This will help identify which areas need attention.
3. Utilizing Built-in Windows Tools
Disk Cleanup
Windows 10 features a built-in Disk Cleanup tool designed to delete unnecessary files. To access it:
Type “Disk Cleanup” in the search bar and select the app.
Choose the drive you want to clean.
Select the file types to delete (e.g., temporary files, system cache).
Storage Sense
Storage Sense automates disk cleanup. To enable it:
Go to Settings > System > Storage.
Toggle on Storage Sense and configure settings to regularly delete temporary files.
4. Uninstalling Unnecessary Applications
Unused applications take up significant space. To uninstall them:
Go to Settings > Apps > Apps & features.
Review the list and uninstall non-essential programs.
5. Managing Temporary and Cached Files
Temporary files can quickly accumulate and consume disk space. Use Disk Cleanup or third-party tools to regularly clear these files. Browsers also store cached data, which can be cleared from the browser settings.
6. Cleaning Up System Files
Windows Update Cleanup
Old update files can take up substantial space. Disk Cleanup includes an option to remove these:
Open Disk Cleanup and select Clean up system files.
Choose Windows Update Cleanup.
System Restore and Shadow Copies
System Restore points and shadow copies can consume significant disk space. Manage these by:
Typing “System Protection” in the search bar.
Selecting the drive and clicking Configure.
Adjusting the Max Usage slider to limit space usage.
7. Using Third-Party Disk Cleaners
Third-party tools like CCleaner provide more comprehensive cleaning options. They can remove junk files, clean registries, and manage startup programs to free up space.
8. Handling Large Files and Folders
Identifying and managing large files is crucial. Use tools like WinDirStat to find large files and folders. Consider moving non-essential large files to external storage.
9. Moving Data to External Storage
Free up space by moving data such as videos, photos, and documents to external hard drives or USB sticks. Ensure you regularly back up important data to avoid loss.
10. Using Cloud Storage Solutions
Cloud storage services like OneDrive, Google Drive, and Dropbox offer substantial space. Move infrequently accessed files to the cloud to save local disk space.
11. Conclusion
Regular maintenance and mindful storage practices can keep your Windows 10 system running efficiently. Use the tips and tools outlined in this guide to manage and optimize your disk space effectively.
External Authoritative Sources
Microsoft Support: Free up drive space in Windows
CCleaner Official Website
How-To Geek: The Ultimate Guide to Freeing Up Space on Your Windows PC
By following these detailed steps, you can efficiently manage and optimize your disk space on Windows 10, ensuring your system remains fast and reliable.
#Windows 10 Performance#Disk Cleanup#Storage Management#System Optimization#PC Maintenance#Free Up Space#Windows 10 Tips#Specific Techniques:#Disk Cleanup Tool#Storage Sense#Uninstall Programs#Temporary File Management#System File Cleanup#Third-Party Disk Cleaners#Advanced Techniques:#Large File Management#External Storage Solutions#Cloud Storage for Windows#System Restore Management#Windows Update Cleanup#How-To Guide#Windows 10 Efficiency
2 notes
·
View notes
Text
How to Speed Up Your Windows 11 PC
1. Manage autostart programs-disable unnecessary startup program.
Here is how to stop a program from starting automatically
Select the Start button, then select Settings > Apps > Startup .In the Startup Apps area, find the program you want to stop from starting automatically and set it to Off.
2. Clear memory via disk cleanup
To delete temporary files:
In the search box on the taskbar, type disk cleanup, and select Disk Cleanup from the list of results.
Select the drive you want to clean up, and then select OK.
Under Files to delete, select the file types to get rid of. To get a description of the file type, select it.
Select OK.
If you need to free up more space, you can also delete system files:
In Disk Cleanup, select Clean up system files.
Select the file types to get rid of. To get a description of the file type, select it.
Select OK.
3. Uninstall obsolete programs
Select the Start button, then select Settings > Apps.
Find the programs you don’t need, click on it and then select “uninstall”
4. Turn off shadows, animations, and visual effects
In the Windows 11 search box, type sysdm.cpl, press Enter, and then click the sysdm.cpl icon. That launches the Control Panel’s System Properties dialog box. Click the Advanced tab and click Settings in the Performance section. That brings you to the Performance Options dialog box. (Make sure you’re on the Visual Effects tab of the dialog box.) You’ll see a varied list of animations and special effects.
These are the animations and special effects you’ll probably want to turn off, because they have the greatest effect on system performance:
Animate controls and elements inside windows
Animate windows when minimizing and maximizing
Animations in the taskbar
Fade or slide menus into view
Fade or slide ToolTips into view
Fade out menu items after clicking
Show shadows under windows
However, it’s a lot easier to just select the Adjust for best performance option at the top of the screen and click OK. Windows 11 will then turn off the effects that slow down your system.
5. Turn off background apps
Select the Start button, then select Settings > Apps .
Scroll to the entry of the background app you wish to adjust settings for.
Click on the three-dot icon and then on “Advanced options”.
In the “Background apps permissions” section, select “Never”.
6. Turn off app notifications
Select the Start button, then select Settings > System> Notifications, and move the slider to “Off”.
7. Make sure you have the latest updates for Windows and device driver
Select the Start button, then select Settings > Windows Update > Check for updates.
Select the updates you want to install, then select Install.
Restart your PC and see if it seems to run better.
8. Check for low disk space and free up space
You may improve performance if you free some disk space on your PC.
To check for low disk space
Select the Start button, then select Settings > System > Storage . Open Storage settings
Your drives will be listed in the Storage area. Note the amount of free space and total size for each drive.
9. Pause OneDrive Syncing
On the taskbar, look for OneDrive near the notification area.
Select OneDrive > Help & Settings > Pause syncing,and then choose how long you want to pause syncing your files.
10. Check for and remove viruses and malware
Running a system scan to find viruses and malware. If you’ve already installed a security suite such as Norton Security or McAfee LiveSafe, you can use that. Windows 11’s built-in anti-malware app, Windows Defender, also does a great job.
Just type Windows Defender in the search box, press Enter, and click Scan Now. Windows Defender will look for malware and remove any it finds.
11. Last but not the least , if your have a non-genuine Windows 11 on your computer , please activate it with a genuine Windows 11 Key from the Microsfot partner store keyingo.com
1 note
·
View note
Text
Windows Manager Software for Your PC – Why Yamicsoft is a Must-Have

Your Windows PC is a powerful machine — but over time, it can slow down, become cluttered, and behave unpredictably. That’s where Yamicsoft’s Windows Manager software steps in. Whether you’re running Windows 10 or Windows 11, Yamicsoft offers a dedicated system utility suite designed to help you clean, optimize, repair, and customize your operating system with ease.
⚙️ What Is Windows Manager Software?
Windows Manager software is a comprehensive utility designed to give you full control over your computer’s performance, behavior, and appearance. Think of it as your PC’s personal assistant — handling tasks that Windows itself doesn’t always manage well.
Yamicsoft’s offerings — Windows 10 Manager and Windows 11 Manager — go beyond traditional cleaners. They deliver 30+ tools in one lightweight package, allowing users to:
Speed up system performance
Free up disk space
Strengthen system security
Customize hidden Windows settings
Fix common errors and bugs
Manage startup programs and scheduled tasks
🚀 Boost Speed and Performance
Over time, unnecessary files, startup programs, and system errors can slow down your PC. Yamicsoft helps you:
Optimize memory and CPU usage
Disable unneeded services
Streamline boot time
Manage background apps efficiently
🧼 Clean and Organize with One Click
Yamicsoft’s Cleaner module clears out junk files, temp data, registry errors, and invalid shortcuts. Its Disk Analyzer shows you what’s eating up your storage and offers safe cleanup options.
🔧 Repair Tools That Work
From repairing broken registry entries to fixing Windows Update issues, the built-in Repair Center is your one-stop solution for:
Solving system crashes and glitches
Rebuilding corrupted configurations
Restoring essential Windows components
🛡️ Secure and Protect Your PC
Yamicsoft lets you take control of your system’s privacy and security settings. With options to disable telemetry, configure firewalls, and manage account privileges, your data and activity stay protected.
🎨 Personalize Your Experience
Customize Windows like never before:
Change system icons and login screen
Manage context menus and shortcuts
Tailor the user interface to suit your needs
Tweak advanced system behaviors with safety
💼 Who Is It For?
Yamicsoft’s Windows Manager is ideal for:
Everyday users looking to speed up their computers
IT professionals managing multiple systems
Power users who want full control over Windows
Anyone experiencing system slowdowns or errors
✅ Why Choose Yamicsoft?
30+ tools in one intuitive interface
Safe, fast, and lightweight
Compatible with the latest Windows updates
Regular updates and lifetime license options
Backed by years of trust in PC optimization
📥 Ready to Optimize Your PC?
Download Windows 10 Manager or Windows 11 Manager from www.yamicsoft.com and discover just how smooth and fast your PC can really be.
0 notes
Text
Why Your Computer Gets Slower Over Time — And What You Can Do About It

Ever wondered why a computer that once felt lightning-fast now takes forever to load? You're not alone. Over time, every computer tends to slow down. Whether it’s an older machine or a fairly new one, the frustration is real. Understanding why this happens is the first step to fixing it—and even preventing it.
In this guide, we’ll explore the most common causes of slow PCs and what you can do to bring them back up to speed. If you’re looking for more in-depth solutions, don’t miss our full guide on how to speed up a slow computer.
1. Hidden Bloat and Startup Programs
You install a cool new app today. Then another one next week. Eventually, your system is packed with software—some of which you don’t even remember downloading. Many of these programs run in the background, especially at startup, slowing down your boot time and eating up system resources.
💡 Quick Fix:
Open Task Manager and check the Startup tab.
Disable apps you don’t need launching at startup.
Uninstall programs you no longer use.
2. Running Low on Disk Space
A nearly full hard drive can really hurt your PC's performance. Windows needs free space to manage system files and temporary data. When your drive is full, everything slows down—searches, app launches, and even basic file browsing.
🧹 What to Do:
Delete junk files and downloads.
Use Disk Cleanup or Storage Sense (on Windows 10).
Empty the Recycle Bin regularly.
This small habit can significantly speed up your machine.
3. Malware and Background Apps
Malware isn’t just a security risk—it’s a major performance killer. Even if your PC isn’t showing obvious signs of infection, malicious software could be silently running, using up memory and CPU power.
🔐 Recommended Actions:
Run a full system scan with Windows Defender or Malwarebytes.
Check for browser extensions that might be slowing down your web activity.
Avoid downloading cracked software or files from unknown sources.
Just keeping your PC clean can make a huge difference in speed and stability.
4. Outdated Hardware or Drivers
Sometimes, it’s not the software—it’s the hardware. If you’re still running on a traditional hard drive, switching to an SSD can make your computer feel brand new. Also, missing or outdated drivers can cause hiccups that slow everything down.
⚙️ Upgrade Ideas:
Upgrade to SSD if you're using an HDD.
Add more RAM if your system is lagging with multiple open tabs.
Update your graphics and chipset drivers regularly.
5. How to Keep Your Computer Fast (Even After Years)
Maintaining a fast PC isn’t just about fixing problems—it’s about building healthy tech habits. A few minutes of monthly maintenance can go a long way.
✅ Pro Tips:
Restart your computer at least once a week.
Keep your system and apps updated.
Schedule regular cleanups using built-in tools.
For a more advanced, step-by-step guide, check out our full article on how to speed up a slow computer. It includes expert-level tips tailored for Windows 10 users.
Final Thoughts
Computers slow down for a lot of reasons—but that doesn’t mean you have to live with it. Now that you know what causes the lag, you can take smart steps to keep your system running smoothly. Whether it’s clearing space, upgrading hardware, or simply restarting more often, every small action adds up.
And remember, when you’re ready to dive deeper into the fix, we’ve got a full breakdown of 10 tech tips to help you speed up your computer, right here.
1 note
·
View note
Text
Why Won’t Cricut Design Space Open on My Computer: Fixed

Are you wondering why won’t Cricut Design Space open on my computer? Are you encountering issues when opening Cricut Design Space? Don’t worry, you are not alone. Many users face this issue when they try to open Cricut Design Space. Several reasons can cause this problem, including third-party software interference, incorrect network settings, and corrupt files.
In this guide, you will get the answer to your question – why won’t Cricut Design Space open on my computer? We are sure you will be able to open Cricut Design Space on your computer after reading this guide. So, without wasting your valuable time, let’s delve into it.
Why won’t Cricut Design Space open?
How to Fix Cricut Design Space Won’t Open Issue
In order to fix Cricut Design Space won’t open issue, follow the steps given below:
Step 1: Confirm Your Computer Meets the Minimum System Requirements
Your Windows or Mac computer should meet the minimum system requirements for using Cricut Design Space. If it doesn’t, it could be the reason why won’t Cricut Design Space open on your computer. Upgrade your device to meet those requirements.
Below are the minimum system requirements for using Cricut Design Space:
For Windows
Operating System: Windows 10 or later*
CPU: Intel™ Dual-Core or equivalent AMD® processor
RAM: 4GB
Disk Space: Minimum 2 GB of free disk space
Connection: An available USB port or Bluetooth connection
Display: Minimum 1024px x 768px screen resolution
Internet connection: Minimum 2-3 Mbps Download and 1-2 Mbps Upload
For Mac
Operating System: macOS 12 or later*
CPU: 1.83 GHz
RAM: 4GB
Disk Space: Minimum 2 GB of free disk space
Connection: An available USB port or Bluetooth connection
Display: Minimum 1024px x 768px screen resolution
Internet connection: Minimum 2-3 Mbps Download and 1-2 Mbps Upload
Step 2: Restart Your Device
A simple restart can fix lots of problems. When you restart your device, it clears out temporary files and frees up memory. In order to restart your device, follow the steps given below:
For Windows
To restart your Windows device, follow these steps:
Firstly, click the Start button.
Then, select the Power icon.
Choose Restart.
For Mac
To restart your Mac, follow the steps below:
Click the Apple menu in the top-left corner of the screen.
Then, choose Restart.
Step 3: Force Reload Cricut Design Space
You can also fix Cricut Design Space won’t open issue by forcing a reload. Sometimes, slow speed can cause the Cricut Design Space won’t open issue. A force reload can solve the problem.
In order to force reload Cricut Design Space, follow the steps given below:
Open the Cricut Design Space app.
Then, find the system menu in the top left corner.
After that, select the View option.
Lastly, select Force Reload from the dropdown menu.
If your Cricut Design Space still won’t open on your computer, move to the next step.
Step 4: Uninstall and Reinstall Cricut Design Space
Whether the Cricut Design Space is out of date or has had an issue, you can fix these most common errors by simply uninstalling and reinstalling it. Here are the steps on how to uninstall and reinstall Cricut Design Space.
How to Uninstall Cricut Design Space?
If you want to uninstall Cricut Design Space from your computer, follow the steps below:
For Windows
Firstly, make sure that Design Space is closed. If it is not closed, the application will not be uninstalled properly.
Select the Start icon and search for Programs.
Then, choose the option Add or remove programs. This will open the Apps & features window.
Type Cricut in the search field and choose Cricut Design Space from the list.
After that, select the Uninstall button.
A pop-up will show up on the screen asking, “Are you sure you want to uninstall Cricut Design Space?”. Select OK to uninstall Cricut Design Space.
The system will finish the uninstallation process. If prompted, restart your computer.
For Mac
Open the Finder and select Applications.
Then, drag the Cricut Design Space from the Applications to the Trash.
After that, right-click on the trash and select Empty Trash. You can also open the trash, click on the gear icon, and then select the Empty Trash option.
Next, click Empty Trash to confirm that you want to permanently delete the trash items.
Finally, the system will finish the uninstallation. If prompted, restart your Mac.
How to Reinstall Cricut Design Space?
Here are step-by-step instructions on how to reinstall Cricut Design Space.
For Windows
Go to the official Cricut Design Space website: Cricut.com/setup.
After that, type your machine model in the search field and select your device.
Select the checkbox confirming you agree to Cricut Terms of Use and Privacy Policy. Then, click on the Download button.
Once the downloading is complete, double-click the file in your browser or Downloads folder.
If a window opens asking if you trust the application, confirm that you trust the app.
Now, an installation progress window will appear.
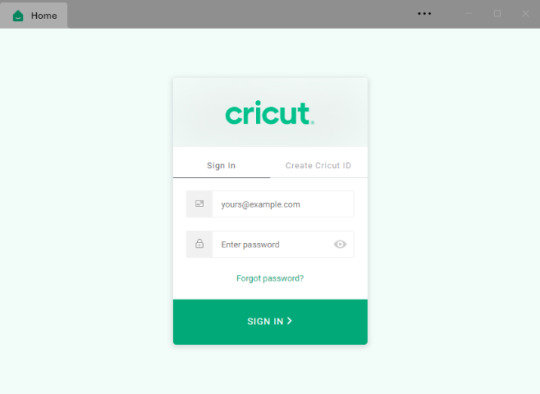
Next, sign in with your Cricut ID and password.
Finally, you have successfully reinstalled Cricut Design Space on your computer.
For Mac
Visit the Cricut Design Space website: cricut.com/setup.
Then, enter your Cricut machine model in the search field and select your device.
Next, check the box to agree to Cricut Terms of Use and Privacy Policy. Then, click the Download button.
Select a location to save the file (By default, it will show the downloads folder). Click Save to start the download.
Now, the file download will start.
When the download is finished, go to the downloads folder. Then, double-click on the downloaded file.
A new window will appear. Drag the Cricut icon into the Applications folder icon to start the installation process. After this, Cricut Design Space for Desktop will be automatically added to your Applications folder.
Then, double-click on Cricut Design Space in your Applications folder in order to launch Design Space for Desktop.
A window will appear asking if you want to open the application downloaded from the internet. Click the Open button to continue.
Lastly, sign in with your Cricut ID and password. With this, you have successfully reinstalled Cricut Design Space on your Mac.
Conclusion
If you are wondering why won’t Cricut Design Space open on my computer. Don’t worry; you are not the only person facing this issue. Many Cricut Design Space users encounter this issue at some point. The Cricut Design Space won’t open issue can be caused by several reasons. The good thing is you can fix it easily in a few minutes.
By following the above-mentioned steps, you will be able to fix Cricut Design Space won’t open issue quickly. Make sure your Windows computer or Mac meet the minimum system requirements, restart your device, and force reload Cricut Design Space. If the issue is still there, try uninstalling and reinstalling Cricut Design Space.
Thank you for reading this post. We hope you find this guide helpful in understanding why won’t Cricut Design Space open on your computer and how to fix Cricut Design Space won’t open issue. Please stay connected with us for more tips and guides to make the most of your Cricut.
Source: why won’t Cricut Design Space open
#why won’t Cricut Design Space open#cricut design space won't open#cricut design space download#cricut design space app#cricut design space software#Cricut Setup
0 notes
Text
How to Download iZotope – Aurora

Discovering and downloading iZotope – Aurora is your gateway to professional-quality mixes with crystal-clear reverb effects. Follow this comprehensive guide to easily access Aurora and elevate your music production game.
Why Choose iZotope – Aurora?
Before diving into the download process, let’s understand why Aurora is a must-have. This intelligent reverb tool ensures your mixes remain clean and dynamic while adding stunning depth and clarity. With features like adaptive unmasking, world-class sound quality, and over 60 professional presets, Aurora is crafted to handle everything from subtle ambiances to expansive, atmospheric effects.
Key Features at a Glance
Adaptive Unmasking: Dynamically adjusts reverb signals to prevent muddiness and ensure vocals and instruments stay sharp.
Multiple Reverb Types: Choose from six options to fit your sound.
Extensive Presets: Access 60+ professionally designed presets for quick and efficient creativity.
Custom Controls: Fine-tune pre-delay, decay, width, tone, and more for your perfect mix.
Steps to Download iZotope – Aurora
Visit the Official Download Page Head over to plugindad.com to find the official download page for iZotope – Aurora.
Check Compatibility Ensure your system meets the following requirements:
For Windows: OS version 10 or 11, 4GB RAM, 300MB free disk space
For macOS: OS version 11.5 or later, 4GB RAM, 300MB free disk space Aurora supports formats like AU, VST, VST3, and AAX, making it versatile across major DAWs.
Add to Cart Click the “Add to Cart” button on the product page and proceed to checkout.
Complete Your Purchase Enter your details and payment information to finalize the purchase. Look out for a confirmation email with your download link.
Download the Installer Once the payment is confirmed, use the provided link to download the installer for your respective OS.
Install Aurora
For Windows: Run the .exe file and follow the on-screen instructions.
For macOS: Open the .dmg file, drag Aurora into your Applications folder, and follow any additional setup prompts.
Activate Your License Launch Aurora in your DAW, enter your activation key, and unlock all features.
With Aurora, your journey to crystal-clear mixes starts here. Unlock its potential and bring your creative visions to life effortlessly.
#iZotopeAurora#ReverbPlugin#MusicProductionTools#AudioMixing#StudioGear#iZotopeCatalyst#SoundEngineering#VocalMixing#AudioEffects#MusicProducers#ReverbSoftware#DAWPlugins#ProfessionalMixing#MusicTech#IntelligentReverb
0 notes
Text
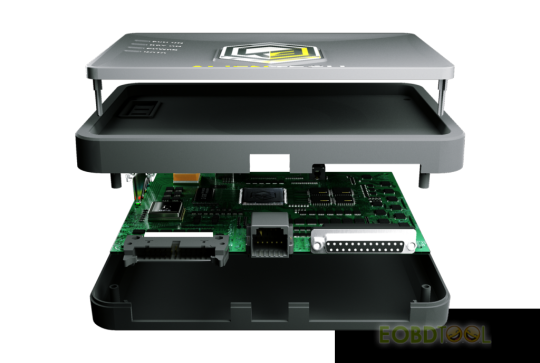
2024 KESS3 ECU Programmer FAQ & Customer Feedback
KESS3 Frequently Asked Questions:
1. How can I interface and program the control units?
With KESS3 you can program the engine control units (ECU) or transmission control unit (TCU) in three different ways:
OBD – With the OBD mode, you can easily access all the ECU data through the diagnostic socket.
BENCH – With the Bench mode you can access the ECU data directly from the connector
BOOT – With Boot mode, with the engine control unit opened, you could connect directly to all the memories of ECU/TCU.
2. What is the difference between Master and Slave?
As a Master user, you can read the files in clear. This allows you to operate independently in order to remap and reprogram the ECU with modified files. As a slave user, only your master will be able to decrypt your files. (Recommended choice for taking the first steps in chiptuning, supported by your Master)
3. Can I update slave version to Master version?
Yes, you need pay the price difference to update it.
4. I have kess3 slave, if i buy kess 3 master from you, can you bind my slave one to the master? Yes, we can do this 5. Can i activate master license and slave license to the same device? No, you cannot.
6. Can I unbind license if i purchase kess3 from othe dealer, then purchase license from you? No possible to unbind device no matter where you buy the machine. You can only buy license and subscription from your own supplier
7. Can i use the tool if subscription expires? Yes, afte the subscription runs out, you still can use it and will have access to all the protocols you had until its expiration date,but if you want to use the latest update softwrae, you need pay new subscription. And after subscription expires, the VR files not possible. Moreover, won't have access to: - technical assistance - VR function - Cloning - All the online services such as ORI file download.
8. If my subscription expires on 1 Nov, 23, I don't renew it until 1 May 24, when does the new subscription expire? From day it ran out.
9. If when my master kess3 subscription is due in Oct, 11th, 2023 and l decide not to carry on paying. Can i have all the protocol updates if I pay for the subscription 6 month later? Yes, you will have all protocols from expiry to renewal period.
10. How to check device serial number? SN is on the back of the kess3 unit, or check in AlienSuite software.
11. What types of vehicles are supported?
Alientech supports hundreds of thousands of vehicles. Not only engine control units, but also transmission control units equipped on cars, motorcycles, tractors, trucks and boats. To know all the vehicles that Alientech supports, you can easily consult our vehicle list.
12. I own KESSv2 / K-TAG. How can I get KESS3?
For all our customers who own a KESSv2 or K-TAG product we have created an trade-in program for your instruments. By choosing to replace KESSv2 and / or K-TAG, you will get a discount on the value of your new KESS3 configuration. Discover the discount reserved for you.
13.I am a KESSv2 / K-TAG customer, but the subscription has expired. Can I get the new tool?
Yes, even for you, during the trade-in phase there is an enhancement of the instrument regardless of the validity of your instrument.
14. Are my old KESSv2 / K-TAG accessories compatible with KESS3?
YES. All KESSV2 or K-TAG accessories are and will be compatible with KESS3.
15. I own KESSv2 / K-TAG. Is there an operating deadline?
The K-suite software and the all related services and infrastructures will continue to be updated and totally functional. After your subscription will be expired, it will no longer be possible to download new protocols
16. Technical specification KESS3
Interface
DB25 connector
Tyco 12 connector
USB 2.0 type B connector
Compatible operating systems
32-bit or 64-bit editions of Windows 11 and Windows 10
RAM: 1 gigabyte (GB) for 32-bit OS or 2 GB for 64-bit OS
Processor: 1 gigahertz (GHz) or faster
Hard disk space: 200 MB
1 USB port
Microsoft® Edge®
Active Internet connection
Optional System Requirements
Bluetooth V4.2 BR/EDR and Bluetooth LE
Wi-Fi 802.11b/g/n
Alientech Srl does not guarantee the correct functioning of the software on operating systems that are not indicated in the table above.
Environmental conditions
Temperature range of us: -10°C/+50°C – 14°F/122°F
Storage temperature rang: -20°C/+70°C – -4°F/158°F
Maximum usage humidit: 60%
Operating altitude: max. 5000 m/16400 ft
Degree of waterproofin: IP X0
ALIENTECH KESS V3 Feedback:

so far tested old edc15p obd
fiat 9gf_t7 bench
edc17c64 boot and bench
insignia edc17c19 bench
old jag delhi mpc555 bdm fail but ktag worked
mazda r2ak under r2ab obd ok
peugeot dmc3.5 obd ok
psa edc17c10 obd , write 30 seconds ish ok
renault edc17c42 obd ok
ford dcm6.1 obd ok
JAGUAR MEDC17.9 BENCH OK
AUDI EDC17C46 BENCH OK
AUDI EDC16CP34 BENCH OK
RENAULT MASTER SID310 BOOT OK
BMW G11 MD1 BENCH OK
NEW 2021 MIN F54 LCI MG1 NOT OK (BUT FLEX TO)
CITROEN EDC17C60 BENCH OK
FORD sid209 obd locked ecu, no recovery
(Use TGflash for FORD SID209 (over OBD) with full recovery — Tactrix OpenPort 2 will work fine)
CNH edc16 and EDC7, not wok recovery original and recorded with kess v2 work
VAG med17.5.5 not read boot, ktag work read
BMW Mevd17.1.2 obd not work
marelli 6jf in bench does not work
marelli 6f3 in bench does not work does not connect and in bdm does not calculate the chk
mjd603 works with bdm connected for cloning
crd1.1 on bench but using obd worked
FIAT MJ8F3 BENCH OK
AUDI EDC17CP14 BENCH OK
OPEL EDC16C9 BENCH OK
FORD SID208 BENCH OK
PSA SID208 BENCH OK
FORD MED17.2.2 BENCH OK
OPEL EDC16C39 BENCH OK
FIAT 9DF (AFTER 2021) BENCH NOT OK BUT FLEX TO FAIL
I´ve done many SID 206 Ford all ok with Kess 3
Sid209 ford no read boot mode, read password failed for OBD…With sid 208 ford bench I had no problems but sid 208 PSA I tried endless connections until I was able to write.
To be continued…

Learn more:
0 notes
Text
How Do I Connect Cricut to Computer: A Step-by-Step Guide
How do I connect Cricut to computer? This was a question I got on one of my blogs a week ago. Not only this, but I also received similar questions regarding connection from many readers. Since none of my posts has a complete guide to Cricut connection in one single guide, I tried to write this.
Without thinking twice, dive into this blog and explore the steps one by one. In this blog, I have answered how do I connect my Cricut to my computer via Bluetooth. Let’s start now!
What Do I Need to Connect My Cricut to a Computer?
In order to learn how do I connect Cricut to computer, you have to first understand what you need before connecting to your Cricut. As we know, the connection is a part of the Cricut setup, meaning we are actually setting up our machines. So, there are things that are required before setup. Let’s get a look into it:
Cricut machine
Power cable to connect your Cricut to a wall outlet
A flat surface like a table for keeping the machine on
A Windows/Mac computer with the following system requirements:
For Windows
Operating System – Windows 10 or later (64-bit)
RAM – Minimum 4GB
Disk – 2 GB free
CPU – Intel Dual Core or equivalent to AMD processor
Display – 1024px x 768px screen resolution
Connectivity – A USB port/Bluetooth connection
For Mac
Operating System – macOS 11 or later
CPU – 1.83 GHz
RAM – Minimum 4GB
Display – Minimum 1024px x 768px screen resolution
A USB port or Bluetooth is required
Disk – 2GB
How Do I Connect Cricut to Computer (Windows)?
You will need to set up your Cricut on a Windows PC, which requires a connection. Since the connection is part of the Cricut setup, you must use a compatible Windows PC, such as Windows 10 or a later version. I have explained the easy steps I followed to connect my Cricut to a Windows computer.
Here are the easy steps to connect your Cricut to a computer on a PC:
First, you need to look for a flat surface to place your Cricut.
Here, ensure the distance is no more than 15 feet from the PC.
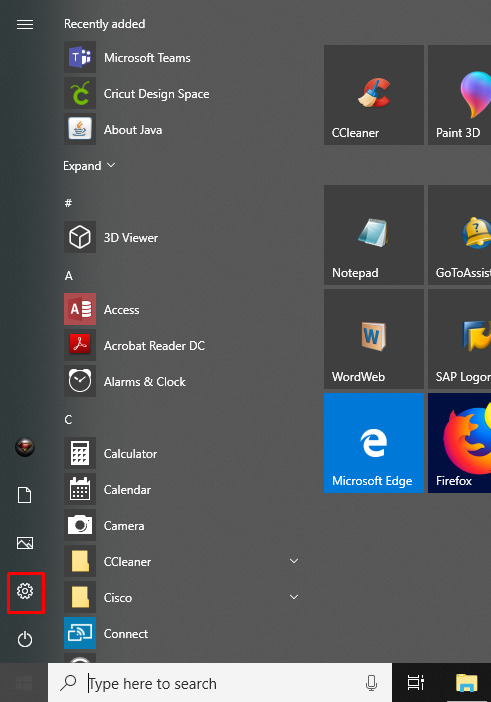
Afterward, go to the Start menu and select a gear icon to open Settings.
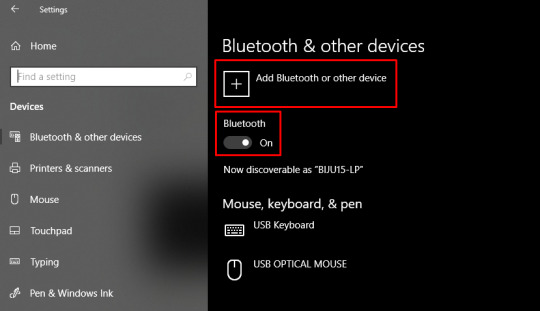
As you click on Settings, you will move to another screen, where you need to click on Devices.

Verify if your Bluetooth is ON, then go to Add Bluetooth or other device.
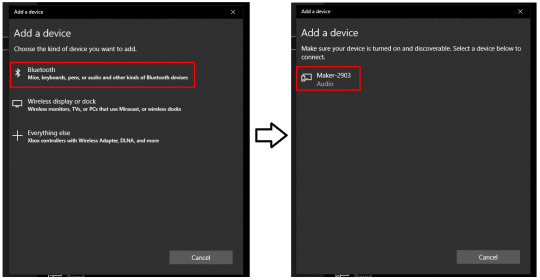
Next, select the Bluetooth option and wait for your PC to detect your Cricut machine.
Select it as it is visible in the open list, and your pairing will be done.
How Do I Connect Cricut to Computer (Mac)?
Mac users need to follow the following steps. However, the placements of Cricut and your computer are almost the same as for Windows. Here are the easy steps to connect your Cricut to a computer on a Mac:
Review if your computer is powered on or off.
After that, move to the Apple menu and choose the System Preferences option.
Now, go to the Bluetooth app on your Mac computer.
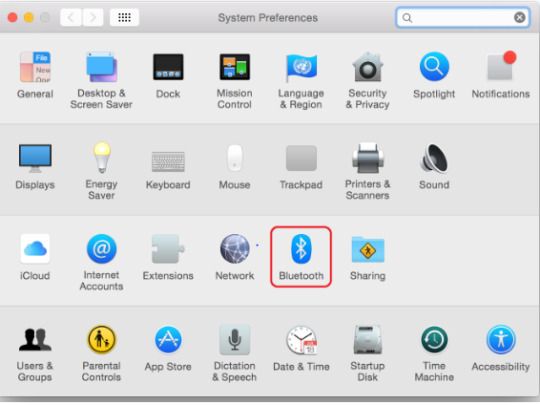
Afterward, turn on the Bluetooth.
Next, select the detected Cricut model from the available list.
Last but not least, you have connected your Mac computer to your Cricut.
FAQs
Question 1: What is the “Connect to Computer via Bluetooth” screen on Cricut?
Answer: The “Connect to Computer via Bluetooth” usually appears during the setup of Cricut Maker 3 or Cricut Explore 3. It happens because the Cricut Design Space app has detected an AMD Ryzen chip on your desktop. Actually, there is a problem with some Windows AMD Ryzen chips that may cause problems when you try to connect your Cricut via a USB cable. Therefore, Cricut recommends you use a Bluetooth connection for these computers.
Question 2: What should I do if my Cricut won’t connect?
Answer: If your Cricut is not connecting to your device, then you need to try the following useful tips:
You need to clear the cache and history of the web browser.
Run a scan on your computer for potential malware.
Defragment the hard disk.
Ensure your firewall or antivirus is blocking Cricut connections.
Question 3: Are all Bluetooth dongles compatible with Cricut machine?
Answer: According to Cricut’s official website, CSR (Cambridge Silicon Radio) Bluetooth dongles are incompatible with the Cricut machine. However, if you want to use a Bluetooth dongle, you need to use one that supports audio devices. Cricut doesn’t guarantee that all dongles will connect to your machine, but those that support audio devices are more likely to be able to connect.
Conclusion
To learn how do I connect Cricut to computer, I have explained all the steps carefully. Before that, I also mentioned things that were required before the Cricut setup. In it, I have especially discussed the system requirements. Make sure your Cricut meets the requirements so that you can do the setup in no time. To have an error-free, smooth connection with the Cricut software, go to this write-up and follow the steps mentioned above.
Read more: install cricut design space app
cricut.com/setup mac
Cricut Design Space
Cricut New Machine Setup
Source: How Do I Connect Cricut to Computer
#How Do I Connect Cricut to Computer#Cricut New Machine Setup#install cricut explore air 2#cricut design space#cricut explore 3#cricut.com/setup#design space signin#cricut.com/setup mac#cricut.com/setup windows
0 notes
Text
Cricut App for PC: Access the Innovative Crafting Software
Hello, my lovely DIYers, and welcome back to my other blog. Today, I will teach you how to get the Cricut app for PC. In the previous session, I discussed the Cricut app and its role in crafting projects. But if you are a newbie and completely clueless, don’t worry—I will help you with everything. I have been making customized crafts for more than four years and know which tools are important to create DIY projects.
Cricut Design Space is a crucial tool for all DIYers as it allows them to make several projects. The app also comes with a library that holds images, fonts, and ready-to-use projects. In addition, the Cricut software works with all Cricut cutting machines and can be downloaded on Windows and Mac computers. This guide will help you learn how to get the Cricut Design app on your separate computer.
Minimum System Requirements to Download Cricut App for PC
Before making the final call to get Design Space on your Windows or Mac operating system, ensure they fulfill the basic system requirements. Look at this part of the post below; you will have a clear idea of the essential system requirements your computer should have to support Cricut software.System RequirementsWindowsMacOperating SystemWindows 10 or a recent system. Intel Dual Core or similar processor. 4GB RAM with 2GB free disk space. Windows must have a USB port and an in-built Bluetooth technology. Screen resolution with 1024px x 768px.macOS 11 or the latest version. 1.83 GHz. RAM: 4GB 2 GB free disk space Must support wired and wireless connection. Screen resolution with 1024px x 768px.Internet ConnectionDownload: At least 2-3Mbps Upload: At least 1-2MbpsSame as the Windows operating system.Offline FeatureIt can be operated without internet connectivity.It can be operated without having an internet connection.
Equally important, it’s time for you to dig into the blog and acknowledge yourself by coming across the Design Space download & installation process.
Download and Install the Cricut App for PC
If you are keen to know which segment you can use to get the Cricut Design Space on your Windows & Mac computer, then this segment is best for you. It will teach you the entire process following which you can get this software on your respective PCs:
Windows
To download, launch, and install the Cricut Design app on your system, you are instructed to follow the steps given below:
Take the initiative by switching on your Windows computer and opening Google Chrome.
Now, navigate Cricut Design Space’s official portal and tick the Terms & Conditions checkbox.
After clicking the box, select the Download button, and the file will instantly begin to download to your system.

When the download is concluded, open the browser or Downloads folder on your device.
Now, double-click the .exe file, and a setup installation window will appear on your desktop screen.
At this point, you need to hold on till the download process is currently active.
Following this, open the installed app, sign in, or create your account.
Conclude the download of the Cricut app for PC by starting to create new DIY designs on the canvas.
In addition to the blog, take a look at the section below to learn about installing the Cricut software on a Mac system.
Mac
Simultaneously, the below steps will guide you in successfully installing Design Space on your computer.
Start the Cricut installation process by opening the Safari search engine.
After it opens, you need to visit design.cricut.com and hit the Download button.

Now, you will get to see a small window in which you need to choose the folder where you want to save the Cricut Design Space file.
Also, choose the Downloads folder and then hit the Save button given inside the blue box.

At this point, minimize the search engine and open the Downloads folder.
Following this, double-click the .dmg file and move the Cricut Design app to the Applications folder.
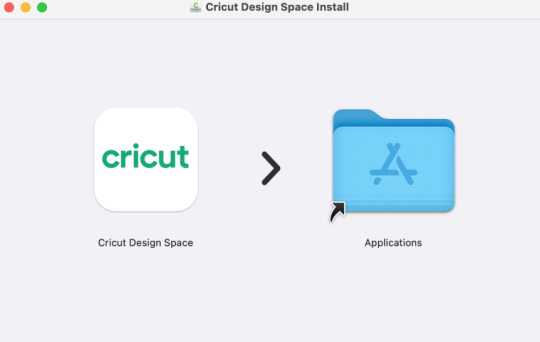
Now, launch Cricut Design Space by opening the Applications folder and double-clicking the Cricut app.
Next, a Mac window will open, confirming you to open the application.
Equally important, you are supposed to click the Open button and proceed towards the next step.
At this moment, you need to sign in to your Cricut account by using your username & password.
On the contrary, if you don’t have an official ID, create one by entering the required details on the page.
Final Words
As a result of the Cricut app for PC blog, you got introduced to the concepts of the Cricut Design Space software, system requirements, and how to get it on your Windows & Mac systems. No doubt, you need to pay special attention while performing the Cricut software download & installation process on your device.
Read more: install cricut design space app
cricut.com/setup
cricut.com/setup mac
Cricut New Machine Setup
Source: cricut app for pc
#cricut app for pc#Cricut New Machine Setup#install cricut explore air 2#cricut explore 3#cricut design space#cricut.com/setup
0 notes
Text
How to Move Windows to Another Drive [2024 Updated] - Technology Org
New Post has been published on https://thedigitalinsider.com/how-to-move-windows-to-another-drive-2024-updated-technology-org/
How to Move Windows to Another Drive [2024 Updated] - Technology Org
Whether you’ve snagged a new SSD or aim to switch to a roomier drive, the real question is “How to move windows to another drive?” But worry not. This guide shares the complete knowledge of transferring Windows, aka “cloning,” to a new drive with three methods without losing data.
We’ve also shared the prep steps in the drive cloning process and dished out insights on the effort and time each method demands, empowering you to make a savvy decision. So, let’s transfer Windows to a new hard drive now!
Part 1: When Do You Need to Move Windows to Another Drive?
You may need to transfer Windows to new hard drive, such as a larger one, to fix the insufficient disk space issue. Or want to move Windows to another drive, like an SSD, due to the advantages it offers over HDDs, such as:
Ensure a notably faster and more efficient startup with quick data reading and writing speeds.
Offers faster data access speeds, providing quicker application loading and heightened system responsiveness.
Have no moving parts, thus reducing the risk of mechanical failures.
Provide shock resistance for increased durability.
Contributes to energy efficiency due to lower power consumption.
Part 2: Preparation Before Moving Windows to Another Drive
Before you move Windows 11 to another drive or downgrade to an older OS version, preparing beforehand is wise to prevent boot errors. Here’s what you need to do:
Backup Your Data – Back up your valuable data on the target disk, as the Windows migration involves rewriting the entire disk.
Get a Larger Drive – Choose a new disk with more capacity than your current drive and keep 30% to 40% of free space on the system disk. This is to maintain high-level computer performance and stability.
Set Up the New Disk – Install the new disk using a SATA Cable to your PC, then initialize it to MBR or GPT (the same disk type as the source OS drive). If the target drive is old, clear all existing data and partitions.
Choose an OS Migration Tool – Select an efficient tool according to your technical knowledge to move Windows installation to another drive.
Part 3: Three Methods to Move Windows to Another Drive
We’ve delved into three ways to move Windows 10 to another drive. You can either use a cloning tool to copy the OS from an HDD to an SSD or create a system image and recover it on an SSD. Another choice is to go for the easiest route with a third-party Partition Manager tool. Check out the detailed steps below, which we’ve shared in detail for each method:
Method 1: 4DDiG Partition Manager
Time
25 -30 minutes
Ease of Use
Beginner-friendly
Tools
4DDiG Partition Manager and your new drive
Drawback
Priced at $9.9 on Christmas Sale
For beginners, the top choice is 4DDiG Partition Manager, which provides a one-click solution to move Windows installation to another drive without reinstalling the system. This versatile tool also efficiently clones your entire hard drive for seamless data backup, so there is no need to prepare a bootable USB. More than just that, it provides many more benefits, such as:
Recover deleted, repair RAW, and restore formatted partitions.
Repairs bad sectors and offers comprehensive disk care.
Resize, merge, split, create, delete, and format partitions to optimize disk space.
Transfer windows to new hard drive without losing any data.
Follow the instructions below to move Windows 11 to another drive with the help of this tool:
Step 1: Install the tool on your computer and connect the new drive to your PC.
Step 2: Launch the tool, click “Start,” and choose the new drive as the target disk.
Step 3: Confirm the source disk (selected by default) and acknowledge the overwrite warning by clicking “Sure” and “Start.”
Step 4: Based on the drive size, it will take some time to transfer Windows to new hard drive. You can check the migration speed, elapsed time, and related data in the meanwhile. Press “Finish” when the OS transfer is complete.
Method 2: Windows System Image Tool
Time
40-50 minutes
Tools
Windows inbuilt System Image tool, bootable USB, and new drive
Ease of Use
Medium
Cost
Free
Drawbacks
Time-consuming backup and setup; carries a risk of data loss or corruption.
For professional users who don’t mind the manual steps, another effective method involves using a Windows System Image to move Windows 10 to another drive. Start by creating a system image backup, then a recovery USB, and finally, restore the system image to a new drive. Here’s how to move Windows to another drive with detailed steps using the Windows System Image tool:
Step 1: Create a System Image Backup
Connect an empty external drive (SSD or HDD) to your computer.
Open “Control Panel” and head to “System and Security.”
Choose “Backup and Restore,” select “Create a system image,” then tap “Start backup.”
Choose a destination drive with enough space for the system image backup and click “Next.”
Opt for either “Let Windows choose” or “Let me choose” to select what to backup. Click “Next.”
Finally, tap “Save settings and run backup” to generate the system image.
Step 2: Create a Recovery USB
Plug in a USB to your computer.
In the Control Panel, type “ Create a recovery drive” and click on it to open.
Mark “Back up system files to the recovery drive.” Hit “Next.”
Choose the USB as the target, click “Next,” and follow the onscreen instructions to complete the process.
Step 3: Move Windows to Another Drive
Turn off your computer, open its case, and remove the old hard drive.
Connect the recovery USB and external drive to your PC with the system image backup instead.
Reboot the system, press F2/Del for BIOS, and set the PC to boot from the USB recovery drive.
On the “Windows Setup” screen, click “Next,” set language, keyboard, etc., then click “Next.”
Head to “Repair your computer” and choose “Troubleshoot.”
Select “Advanced options,” then tap“System Image Recovery.”
The newest backup will appear; if it fails, pick the right one from the external drive and click “Next.”
Check “Format and repartition disks” and click “Next.”
Confirm by clicking “Yes” and “Finish” to move Windows installation to another drive.
Wait for the system recovery to finish, reboot, and Windows will start automatically.
Method 3: Clonezilla
Time
4-5 hours for a 1TB drive
Tools
Clonezilla, bootable USB, and external drive
Ease of Use
Difficult
Cost
Free
Drawbacks
Time-consuming; Requires advanced tech skills; Cloning can fail due to bad disk sectors.
Another option to move Windows 11 to another drive is by cloning the entire disk. You can do this through an open and free-source cloning tool like Clonezilla. It will clone the OS, applications, and data from your disk, so you don’t need a backup. You can also use Clonezilla as a backup tool to clone your disk data before using the System Image or 4DDiG tool. Here’s how to transfer Windows to new hard drive with Clonezilla:
Step 1: Reduce Partition Size (Optional)
You must reduce the partition size if you’re using Clonezilla to move Windows to another drive that is smaller. But if the destination drive is equal to or larger than the source drive, skip this step. Here’s what to do to reduce partition size:
Press the “Windows + R” keys and type in “diskmgmt.msc.” Press Enter to open Disk Management.
Right-click the main volume (C:) and select “Shrink Volume.”
Adjust the volume size to shrink and tap “Shrink.”
After shrinking, you’ll see unallocated space. Right-click on the unallocated space and select “New Simple Volume” to create a new partition or leave it unallocated for the cloning process.
Step 2: Download Clonezilla and Prepare a Bootable USB
Visit the Clonezilla download page, choose the ISO option, and click “Download.”
Visit the Rufus website and download the latest version of the tool to create a bootable USB.
Launch the tool, select your USB, click “Select,” choose the Clonezilla ISO, click “Open,” and hit Start.
Step 3: Clone Windows to Another Drive
Connect your new drive to your computer.
Boot your computer using the bootable USB. When Clonezilla loads, hit “Enter” for default settings.
Choose your language, select “Don’t touch keymap,” and start Clonezilla.
Opt for “Beginner mode,” pick “disk_to_local_disk local_disk_to_local_disk_clone,” and press “Enter.”
Choose the source and target drives and decide whether to check or skip the source file system.
Choose “reboot/shut down/etc” when everything is finished.
Confirm the cloning process by typing Y thrice. Press “Enter” each time. This is to confirm everything’s good with the cloning process, data overwrite in cloning, and getting the boot loader cloned (for a bootable Windows drive). Next, the software will move Windows 10 to another drive by cloning.
Conclusion
In our comprehensive guide on how to move Windows to another drive, we’ve covered three methods catering to diverse technical skills. If you’re not tech-savvy, the ultimate choice is 4DDiG Partition Manager.
This user-friendly tool is a time and effort-saver, offering a one-click Windows OS migration to SSD sans the hassle of reinstalling. It’s also efficient at cloning your entire hard drive for data backup, eliminating the need for a bootable USB.
#2024#applications#back up#backup#Christmas#clone#comprehensive#computer#control panel#data#data backup#data loss#delete#efficiency#energy#energy efficiency#Featured technology news#GPT#hard drive#hdd#how#how to#insights#ISO#it#keyboard#language#loader#management#merge
0 notes
Link
One of the big questions in cosmology asks when black holes first showed up in the early Universe. Recently astronomers discovered the most distant (and therefore earliest) supermassive black hole ever seen. It appears as it did when the Universe was only 470 million years old.This monster black hole is really bright in X-rays, which made it a great target for the Chandra X-ray Observatory. It’s also just bright enough in infrared light for the James Webb Space Telescope to see. “We needed Webb to find this remarkably distant galaxy and Chandra to find its supermassive black hole,” said Akos Bogdan of the Center for Astrophysics at Harvard. Bogdan and his team just published a paper about the observations. “We also took advantage of a cosmic magnifying glass that boosted the amount of light we detected.” Essentially astronomers got their data through a gravitational lens, then combined data from both orbiting telescopes to create a unique look at the black hole.The black hole is the heart of a quasar—an active galaxy called UHZ1. Its light is magnified by passing through the nearby galaxy cluster Abell 2744. That light left the quasar when the Universe was only 3 percent of its current age. Webb spotted it thanks to faint infrared signals from the activity surrounding the black hole. Chandra observed it for two weeks and found a huge amount of X-ray emissions from superheated gas in the galaxy. This indicated to them that the black hole is rapidly eating up material around it.Quasars With Black Holes in the Infant UniverseQuasars in the early Universe tell us a lot about conditions in the time after the Big Bang. In particular, they open a window on black hole formation. It’s not completely clear how some supermassive black holes grew to be so massive so quickly after the Big Bang. First, you have to understand how they formed. Were they born from the collapse of massive gas clouds to create black holes ranging up to 100,000 solar masses? Or, were the explosions of the first supermassive stars the culprit? If So, the mass of those black holes would have been only 10 to 100 solar masses. Understanding the formation scenario helps astronomers understand the conditions at the time.“There are physical limits on how quickly black holes can grow once they’ve formed, but ones that are born more massive have a head start. It’s like planting a sapling, which takes less time to grow into a full-size tree than if you started with only a seed”, said paper co-author Andy Goulding of Princeton University.How a large black hole can form from the direct collapse of a massive cloud of gas a few hundred million years after the Big Bang. Panel #1 shows a massive gas cloud and a galaxy moving towards each other. If the formation of stars in the gas cloud is stalled by radiation from the incoming galaxy, that prevents it from forming a new galaxy. Then, the gas can collapse and form a disk and black hole. Panels #2 and #3 show the beginning of this gas collapse in the center of the cloud. A small black hole forms in the center of the disk (panel #4). The black hole and disk then continue to grow (panel #5). This massive black hole “seed” and its disk then merge with the galaxy shown in panel #1. For a period the black hole is unusually massive compared to the mass of the stars in the galaxy. That makes it an Outsize Black Hole (panel #6). The black hole pulls in stars and gas from the galaxy. That causes the black hole and disk to grow even larger. Courtesy NASA/STScI/Lea HustakA Good Formation ScenarioFor this particular black hole, the first scenario seems to explain how it formed. You can tell by its mass—10 million to 100 million solar masses—that the infall of a massive gas cloud that created it. The brightness and intensity of the X-rays Chandra detected tell the tale. Also, the mass of the black hole is about equal to the mass of all the stars in its host galaxy. The authors of the paper refer to it as an “Outsize Black Hole.”“We think that this is the first detection of an ‘Outsize Black Hole’ and the best evidence yet obtained that some black holes form from massive clouds of gas,” said Piyamvada Natarajan of Yale University, whose 2017 work predicted such an object. “For the first time, we are seeing a brief stage where a supermassive black hole weighs about as much as the stars in its galaxy before it falls behind.”Black Holes at Early EpochsIn their paper, the authors of this discovery point out that quasars with supermassive black holes like the one in UHZ1 were in place well before 700 million years after the Big Bang. So, they existed, but their origins remain something of a mystery. Searching out the “seeds” of these objects requires looking at many of these galaxies across huge distances. By the time their light reaches us, it’s highly redshifted. That’s why Webb is required to detect many of these galaxies. Once that’s done, figuring out the X-ray emissions helps tell the rest of the tale.Of course, the authors had to differentiate between active star-forming regions and black hole formation in these distant galaxies. They also had to make sure it wasn’t coming from any intracluster gas regions in the intervening Abell 2744 cluster. What’s left after all the analysis is a conclusion that these early massive black holes were born when the massive “seeds” (clouds of gas) coalesced in a very short period of time after the Big Bang.As the JWST finds more early galaxies in the infant Universe, more of these “Outsize Black Holes” will certainly show up. Their existence and the conditions around them should help solidify the theory behind the black hole “seeds” in early gas clouds.For More InformationNASA Telescopes Discover Record-Breaking Black HoleEvidence for Heavy Seed Origin of Early Supermassive Black Holes from a z~10 X-ray QuasarUNCOVER: The Growth of the First Massive Black Holes from JWST/NIRSpec—Spectroscopic Redshift Confirmation of an X-Ray Luminous AGN at z = 10.1The post Growing Black Hole Seen Only 470 Million Years After the Big Bang appeared first on Universe Today.
0 notes
Text
How to Clear Cache on Windows 10/11


6 Comprehensive Methods to Clear Cache on Windows 10/11!
Windows 10 is a powerhouse, designed to offer a seamless user experience. Yet, over time, accumulated cache can occasionally bog down its performance. Fear not, for this article will be your comprehensive guide on how to clear cache on Windows 10/11, allowing your PC to breathe freely again. 1. Clear Browser Cache: Your Gateway to the Internet https://www.youtube.com/watch?v=NYevMttVAFM Clear Cache on Windows 10/11: Video From Youtube Web browsers such as Chrome, Firefox, and Edge constantly store data to enhance your browsing experience. To ensure they don't become the reason for a slowdown: - Launch your preferred browser. - Use the shortcut Ctrl + Shift + Delete for instant access to data clearing options. - Opt to clear cached images, files, and any other relevant data. - Confirm by clicking Clear. 2. Microsoft Store: Clearing for a Smooth Shopping Experience Sometimes, glitches with the Microsoft Store trace back to cache problems. To sort this: - Input "wsreset" in the Windows search bar and select the application. - A blink-and-you-miss-it command prompt window will appear, followed by the Microsoft Store launch. Voila! Cache cleared. 3. Temporary Files and System Cache: Unseen but Crucial These files can accumulate swiftly and clog system performance. - Search for "Disk Cleanup" in Windows. - Opt for the drive you want to refresh (commonly the C: drive). - Tick boxes like "Temporary files" and any other clutter you'd like to get rid of. - Finalize by clicking "OK" and then "Delete Files". 4. Windows Update Cache: Ensuring Smooth Updates Updates are essential, but sometimes they might face hiccups due to cache. - Initiate a Command Prompt with administrator rights. - Key in "net stop wuauserv" and proceed with Enter. - Journey to C:WindowsSoftwareDistribution and discard everything inside. - Revert to the Command Prompt and restart the update service with "net start wuauserv". 5. Thumbnail Cache: For Those Perfect Previews Thumbnails give you quick previews, but cache issues can disrupt this. - Look up "Disk Cleanup" on Windows. - Choose the typical C: drive. - Ensure "Thumbnails" is checked alongside any other options you wish to address. - Wrap up with "OK" and a "Delete Files" confirmation. 6. DNS Cache: Streamlining Your Connection Encountering odd website behaviors? DNS cache might be at play. - Start an administrator-level Command Prompt. - Simply type "ipconfig /flushdns" and give it an Enter. All done! Also Read: How to clear cache on Android
Features
- Immediate System Refresh: Deleting cache instantly declutters and refreshes your system. - Enhanced Browsing Experience: Clearing browser cache ensures you're seeing the latest version of websites. - Optimal Microsoft Store Performance: Ensure a glitch-free shopping experience with cache maintenance. - Smooth Windows Updates: Keep updates running smoothly by managing the Windows Update cache. - Quick Thumbnail Loading: Prevent broken or slow-to-load thumbnail previews. - Uninterrupted DNS Performance: Ensure a stable connection by addressing DNS cache. Also Read: How to Clear Phone Cache on iPhone
Benefits
- Speed Boost: With cleared cache, most users notice an immediate improvement in system responsiveness. - Storage Recovery: Cache files can take up a significant amount of storage. Clearing them can free up precious space on your drive. - Problem Prevention: Regular cache management can preemptively solve many problems before they arise. - Enhanced Security: Clearing cache, especially in browsers, can help ensure your privacy and protect sensitive data. External Sources: Windows 10 Support, Wikipedia on Computer Cache Knowing how to clear cache on Windows 10 effectively can feel like wielding a magic wand. With the right steps, you can instantly boost performance, ensuring your Windows 10 experience is as smooth and efficient as it was meant to be. Happy computing!
FAQs
Why is clearing cache on Windows 10 important? Clearing cache helps in enhancing the speed and performance of your system. Over time, accumulated cache can slow down your computer and hinder its functionality. How often should I clear my browser cache? While there's no strict rule, it's generally recommended to clear browser cache every 4-6 weeks. This ensures you're viewing the most updated versions of webpages and prevents websites from loading slowly. Does the "wsreset" command clear cache for all Windows apps? The "wsreset" command is specifically designed to reset the Microsoft Store. It clears the cache of the Microsoft Store app, which can solve certain functionality issues. Are there any risks associated with clearing Windows Update Cache? While clearing the Windows Update Cache can solve update-related issues, there is a slight risk. Deleting the wrong files can cause further update complications. Always ensure you're following the steps correctly and only deleting contents inside the specified folder. What does the "ipconfig /flushdns" command do? This command is used to clear the DNS (Domain Name System) cache. DNS cache stores the IP addresses of web servers that contain recently viewed websites. By clearing it, you're removing all the old and possibly incorrect entries, which can resolve some connectivity issues. After clearing cache, will my computer instantly speed up? In many cases, clearing cache can lead to noticeable improvements in speed. However, the first time you revisit certain applications or websites, they might load slightly slower as they rebuild their cache. Do I need third-party software to clear cache? While the methods mentioned in the article utilize built-in Windows features, there are third-party software options that can automate and provide deeper cleaning. However, always download such software from reputable sources to avoid malware. Why do thumbnails need cache? Thumbnails use cache to quickly display previews of content, such as pictures or videos, without needing to fully load the file. Clearing the thumbnail cache can help when these previews aren't displaying correctly. Is clearing cache the same as deleting my saved files and data? No, clearing cache will not delete personal files or essential data. Cache consists of temporary files meant to speed up tasks. When cleared, some tasks might take slightly longer the first time as the cache rebuilds. Can I selectively choose what cache to clear? Yes, tools like "Disk Cleanup" provide options on which types of cache and temporary files you wish to clear, offering users flexibility in their cleaning process. Read the full article
1 note
·
View note
Note
Okay seriously do you have any tips on how to free up computer space? It feels like a constant struggle 😩
OKAY BIG DISCLAIMER I AM NOT!! TECH SAVVY! Please take what i say with a grain of salt Im just out here looking at forums and hoping for the best 🙏🙏🙏
Honestly, it's pretty hard. Generally I have an external memory where i store backups of my old stuff but for the most part i try to keep all my files on my laptop, so i keep the hefty files and everything in my :D/ section since its beefier, but ofc I need certain things on the SSD like games and stuff so they can run properly.
I pretty much just learned everything today, i went into the file explorer for hours hitting 'properties' on all the folders to see which ones were taking up space and which ones weren't, ended up deleting and moving around a bunch of stuff (i had a reference folder on my desktop that i thought wasnt too big and it was 9GB of images.......... woof)
While poking around on threads I also discovered this other app that creates an image of whatever drive you need it to make, and displays every file as a square of proportional size, so you can actually figure out what the fuck is taking up all of ur space https://windirstat.net/
OH AND ALSO, if you right click on the drive youre trying to clear, and hit properties, itll bring up a special properties window with a little circle diagram that tells you how much is being used, and right next to it is a 'disk clean up' button that helped me get rid of a bunch of phantom space. apparently, windows saves previous versions and certain files that just take up huge gigs of space.
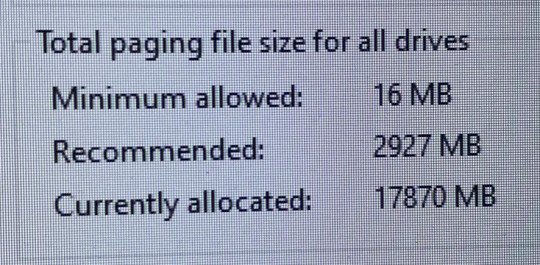
another thing that was taking up space for me was the paging file, a necessary system file ofc, but that for some reason was taking up a whopping 18 fucking gigabites. I got that one fixed using this explanation, but also take this with a grain of salt bc i am not a computer expert! idk how reducing this file could impact ur machine (i just did it cause the recommended was way smaller than what id allocated. like... thats a little ridiculous i think.)
Oh and last but not least. Spotify was also taking up like 10 gigabytes on my machine inexplicably so I poked around some more threads and changed where the data was stored so that it was no longer on my ssd. So technically i didnt free space with that i just moved it somewhere else. but it works!
Thats all I can think of rn, I also just deleted a bunch of folders that had stayed behind after uninstalling apps by poking around hidden folders, I do NOT recommend deleting folders unless u know what it is you're deleting for sure
But yeah its all like... just a lot of random files everywhere. eventually it all really adds up.
101 notes
·
View notes
Text
Airbrush Photo App

Airbrush Photo App
Ace is the interactive new app for quickly and easily editing and sharing your photos. AirBrush Photo Editor Online is a great tool to enhance your portrait photos without cramming the disk space with different software. It offers easy-to-use skin airbrushing instruments, filter settings and ensures you get realistic results each time you use it. Actually, this image editor is one of the best free alternatives to Photoshop. AirBrush has everything you need to edit your photos like a PRO in a fast, powerful, and easy way. ACCESS ALL FEATURES 😍+ 30 unique features to create the best edits. UNLOCK FILTERS FOR DAYS + 100 exclusive filters following the top editing trends. REMOVE PHOTOBOMBERS 😉Clear stains, pimples and even your ex.

AirBrush is an excellent photo editing app that has tons of useful tools and offers a very comfortable interface. While this app is specially designed for retouching 'selfies', it's also just as well suited when retouching any other kind of photo. Stop worrying about overcharges when using AirBrush: Easy Photo Editor on your cellphone, free yourself from the tiny screen and enjoy using the app on a much larger display. From now on, get a full-screen experience of your app with keyboard and mouse.
Free download AirBrush: Easy Photo Editor for PC Windows or MAC from BrowserCam. Meitu (China) Limited published AirBrush: Easy Photo Editor for Android operating system(os) mobile devices. However if you ever wanted to run AirBrush: Easy Photo Editor on Windows PC or MAC you can do so using Android emulator. At the end of this article you will find our how-to steps which you can follow to install and run AirBrush: Easy Photo Editor on PC or MAC.
AirBrush
You love taking photos, right? But, what about those days when you want pictures that are perfect? It can be quite hard to edit those photos when you don’t have any knowledge, right? Well, you don’t have to have any expert knowledge anymore. You can now edit all those photos to perfect by using the Airbrush app. This photo editing app is the most amazing app and the easiest app you can possibly use for all your photo editing needs.
Here are some awesome features of the Airbrush app.
Edit pictures to Perfection
With the Airbrush app on your phone, you can give your photos the perfection they need. You can use all the user-friendly retouch tools, cool filter options, and those amazing editing effects to give your photos the natural result that you need. You can also remove blemishes, pimples, and even remove those unwanted pictures with a tap of the finger. You can also swipe on your phone when you want to add a radiance of blush on your photos.
Perfection is now Easy
When you see a little yellow hue on your teeth in the photo, worry no more, you can easily whiten them with your fingers. The brightening feature also enhances your eyes and lights up your face in places that you need so that you can get the perfection you want in your photos. Your skin can also be perfect by editing it with a few swipe and taps of your fingers with ease by achieving a perfect and glowing tone on your skin with your smartphone.

Get a Slimmer Shape
You can also slim, reshape, and lengthen your photo with ease. You don’t need photoshop skills when you have the Airbrush app on your phone. The app also has tons of tools that let you blur, crop, stretch, and tune your pictures for those artistic touches for your photo.
Tons of FIlters
You can also add tons of depth and style to your photos. With the latest filters, you can also use them for your photos so that you can give them the beautiful finishing touch. Once you’re all done, you can also share those photos from the app directly to all your social networks like Facebook, WhatsApp, Twitter, Instagram, and even Telegram. So, what you waiting for?


Let's find out the prerequisites to install AirBrush: Easy Photo Editor on Windows PC or MAC without much delay.
Select an Android emulator: There are many free and paid Android emulators available for PC and MAC, few of the popular ones are Bluestacks, Andy OS, Nox, MeMu and there are more you can find from Google.
Compatibility: Before downloading them take a look at the minimum system requirements to install the emulator on your PC.
For example, BlueStacks requires OS: Windows 10, Windows 8.1, Windows 8, Windows 7, Windows Vista SP2, Windows XP SP3 (32-bit only), Mac OS Sierra(10.12), High Sierra (10.13) and Mojave(10.14), 2-4GB of RAM, 4GB of disk space for storing Android apps/games, updated graphics drivers.
Finally, download and install the emulator which will work well with your PC's hardware/software.
How to Download and Install AirBrush: Easy Photo Editor for PC or MAC:
Open the emulator software from the start menu or desktop shortcut in your PC.
You will be asked to login into Google account to be able to install apps from Google Play.
Once you are logged in, you will be able to search for AirBrush: Easy Photo Editor and clicking on the ‘Install’ button should install the app inside the emulator.
In case AirBrush: Easy Photo Editor is not found in Google Play, you can download AirBrush: Easy Photo Editor APK file from this page and double clicking on the APK should open the emulator to install the app automatically.
You will see the AirBrush: Easy Photo Editor icon inside the emulator, double clicking on it should run AirBrush: Easy Photo Editor on PC or MAC with a big screen.

Airbrush Photo App
Follow above steps regardless of which emulator you have installed.
2 notes
·
View notes
Text
How To Clear Up Ram

When you’ve used all the available RAM on your PC or laptop you might notice the system taking way to long to complete tasks, for instance, opening the This PC on Windows 10 or open software from the start menu. This is due to all the physical and available RAM on your system is completed used. Now to make your work smoother you have to clean the computer of yours.
How To Clear Up Ram On Iphone
Free Ram Cleaner For Windows 10
Here, we are typing 'Clear Unused RAM' and hit on the 'Next' button. Once the shortcut is created, switch to the desktop and double-click on the shortcut to clear memory cache on Windows. Method 2: Clear General Cache Disk Cleanup is an integrated feature of Microsoft Windows that. Restarting the PC is a common but effective fix for many computer issues, so is for the issue-insufficient RAM space. You can free up RAM on Windows 10 by rebooting the PC, which can help reset all the running programs and completely clear RAM.
Now you’re thinking, how do I free up ram on windows 10? there are some ways or methods that can be used to free up ram on the computer to boost the speed of the system processing without getting more ram. In this article, we are going to share some of the easy ways to free up ram on Windows 10 PC or laptop without having a hassle.
15Final Words
What is RAM? And Its Use on Computer

Well, RAM (Random Access Memory) is stored in the chipset on your computer motherboard same goes for the laptop. On this chipset, the computer store the short terms data in technical terms the RAM is the hub of the storage for all the programs and activities running on the computer system.
The computer used this stored information to complete the tasks while getting the data on the same time. So technically, when you used all the ram of your computer this may cause slow processing and you might seem all the programs and applications start processing slowing.
Overall the speed of your computer system performance will be decreased. To speed up your computer performance and processing can be easily increased again by cleaning some of the RAM storage on your system. Use below given methods to free up the RAM without hassle.
How To Free up ram on Windows 10 (15 Ways)
If you’re struggling with low Windows 10 system performance or 100% memory usage, High CPU. Then use these methods to free up memory on your computer system to speed up the performance and reduced memory usage.
Restart The Computer System
The Ram is volatile memory, you’ll lose its contents when your computer turned off. Restarting your computer system will clear memory saved on RAM and reset all the running programs and applications. However, this method won’t clear the complete memory but it will boost up the processing speed of the system. By cleaning up apps running on the background on Windows 10.
Update The Windows 10 & Softwares
It is most important to run an updated version of applications and software including Windows to get better system performance.
You must update all the software on your computer system along with the Windows 10 updates. For this Press Windows + I to open Windows settings. Go to the Updates & Security section and click on Windows update > check for updates.
How To Clear Up Ram On Iphone
Lookup RAM Usage
Before getting started the clean of RAM in Windows, you must see what program or application causing the RAM usage for this to follow these below-given steps.
Press Ctrl+Shift+ ESC buttons together to open Task Manager.
Now, Click on More Details to expand the full utility.
Under the Processes tab, click on the Memory heard to sort the app which using more memory
For more deep information regarding the system memory usage, you can go to the Performance tab. Under the CPU section click on Memory to complete an overview of the RAM usage on your computer system. Click on the Open Resource Monitor at the bottom of the Task Manager to get more information.
Use Low Memory Management Web Browsers
If you’re using the default web browser such as Microsoft Edge or Internet Explorer on Windows 10. Then you must try to change the web browser such as Google Chrome or Firefox. Both web browser has low memory management feature that consumes less memory of the RAM. Technically these two browsers are best for memory management on Windows 10 for fast web suffering and downloading.
Remove Bloatware Apps
You must don’t know some of the bloatware apps that you’ve installed on your Windows 10 PC that you’re currently not using them. Such as Skype, WhatsApp, Facebook, Messenger, and many more. These bloatware apps use more RAM of the computer.
If you don’t really need these apps on your computer. Then follow below-given steps to remove apps from Windows 10 PC to free up memory of the computer.
Go to the Start Menu and type in the search bar “Apps and features” and open it.
Now, Scroll to the bloatware app for example “WhatsApp”. Then click on it.
Select the “Uninstall” button to remove it from the PC.
Follow the on-screen uninstallation process to successfully remove the application.
After that restart, the PC to see the performance improvement or Else move to the next method.
Disable Startup Programs & Apps
If you’re using your Windows 10 computer for more than a year. Then you’ve downloaded and installed fair more software and some of this software and now some of that software was no longer in use. By using the third method Lookup Ram usage, Now you know which program using more memory and some of these apps are on startup.
This means the startup apps will automatically start running when you start your computer system. So to avoid this you can disable the startup apps on Windows 10 to boost up the memory of RAM.
Follow these below-given steps to disable startup programs.
1. Press Ctrl+Shift+ESC buttons together to open Task Manager.
2. Now, Go to the Startup tab.
3. Right-Click on the app that you no longer use on your PC.
4. From the pop-menu, select the “Disable” button.
Clear Web Browser Cookies & Cache Files
If you’re using the web browser on a regular basis to open different types of websites daily. Well, you must that every website has its cookies and cache that will be saved into the computer memory. When visited that website, Basically the cookies and cache help the web browser to load the web page faster for the next time when you open that website.
So, if you’ve haven’t cleared the cache on the web browser that you’re using on your computer for far longer. Then you’ve saved cookies and caches in GB that consuming the memory of the RAM. You can easily free up the RAM by clearing the cookies and cache of the web browser.
Note: After removing the cookies and cache in a web browser all the auto-login credentials will be deleted. You need to again login into the website.
To clear Cache and Cookies from a web browser (Google Chrome)
1. Open the Web Browser using the Start Menu or Desktop Shortcut.
2. Now Click on the (…) icon given at the right top corner to open the menu list.
3. Select, then Settings from the popup menu.
4. Navigate to the Privacy and Security section.
5. Now, Clear the Browsing Data, Cookies, Cache.
For the different web browsers such as Microsoft Edge, Firefox, etc. There are different steps to clear the browsing history along with cookies and cache files.
Disable Background Apps
In Windows 10 lots of apps were running on the background of the system that cannot be seen in the display screen. However, these apps are consuming memory of the RAM and some of these apps are malware that affects computer running performance.
To increase the performance of the computer along with RAM memory, you’ve to stop the background running apps on the Windows 10.
Free Ram Cleaner For Windows 10
1. Press Windows + I keys from the keyboard to open Windows Settings.
2. Go to the Privacy section.
3. Scroll down the left side panel. Then select “Background Apps” from the panel.
4. Now, disable the app that no longer in use.
Apps are often to run on the background of the computer system. This enables the apps to send notifications and update the software automatically which consumes lots of RAM memory without taking your permission. So you can easily turn off background apps on Windows 10 that are no longer useful.
Turn off Visual Effects
Windows 10 comes with pre-install visual effects such as tooltips, menus, and many more. This visual effect consumes lots of RAM space on the device, however, these visual effects won’t cause many issues. But if you’re device has lesser RAM then, in this case, you can disable visual effects to speed your computer performance by reducing the RAM storage.
To disable visual effects on Windows 10 follows –
1. Press Windows + E keys to open the File Explorer window.
2. Now, Right-Click on the This PC and choose Properties.
3. Go to the Advanced System Settings.
4. After, this Click on the Settings option given at the Performance section.
5. Click on “Adjust for the best performance”.
Now all the visual effects will be disabled with these settings. In case if you want to customize the visual effect settings and click on custom and select any visual effect that you want to use or like.
Modify Virtual Memory on Windows 10
In Windows, the page file that used hard disk storage and works as virtual memory and you can make adjustments in virtual memory to speed your computer and free up RAM on Windows 10.
Follow the steps to change virtual memory on Windows.
1. Open Control Panel using the Start Menu.
2. Change the Category view to Small icon (if needed)
3. Click on the “Advanced System Settings” to open it.
4. After this, on the Advanced tab, Select the Settings given under the Performance panel.
5. Switch to the Advanced tab again and click on the Change button.
Remove Web Browser Extensions
We all used Google Chrome, Firefox, or Edge browser on Windows 10. It doesn’t matter which browser you’re using on your system. However, to get additional features such as download any video from the web page we used web extension.
Technically, these extensions carry malware with them into your PC that used lots of the RAM. For instance, you can see using the Task Manager in the processes tab. Sometimes the Google Chrome using lots of RAM this is because of the extensions that you’ve installed on the Chrome browser.
To free up the ram on Windows 10 remove the unwanted web extensions from the web browser that you’re used on a daily basis such as Google Chome.
Clear Page File Before Turning off PC
When you restart your PC the page files don’t get cleared because they are stored in the memory of the RAM technically the short term files store in hard drive. So after the shutdown of the PC, the page files don’t remove the file still remain the same and consume the memory of the RAM.
Technically, clearing the page files from the PC hard drive will free up the RAM space on your computer system. Fortunately, you can make page files deleted automatically when the system shutdown. To do that follow below-given steps.
Type “Registry Editor” in the start menu search bar.
On the pop-up window select “Yes” to allow Registry Editor.
On the left, scroll to, and select “HKEY_LOCAL_MACHINE ” > “SYSTEM” > “CurrentControlSet. ”
Find and choose “Control ” > “Session Manager.”
Now, choose “Memory Management.”
Select “ClearPageFileAtShutdown.”
Enter the number “1” under the value data and hit OK.
Tip: Copy and paste this link to the registry editor to avoid steps
Final Words
All these methods helped you to clear the RAM of your computer system to boost system performance. These steps help me out a lot of increase my laptop gaming performance on Windows 10. Because due to this I ‘ve free up lots of RAM storage on the device.
Unlike me, you can also try all these methods to free up the RAM on Windows 10 PC or laptop to get smoother computer experience.
Related Articles:
1 note
·
View note